Python on Azure Functions - Round 2
A while ago a customer really wanted a solution based on Python. We already decided on Azure Functions, but Python support at that time was still in preview. I decided to evaluate exactly how preview it was. The result wasn’t really pretty: I didn’t get things to work in Azure, we gave up and told the customer we really needed to stick with C# for the time being. You can read all about it in this blog post.
Python support is still in preview, but on the one hand I know that the team has been working hard to improve things and on the other hand, the Azure Functions v2 runtime has reached the “general availability” status which should mean that it’s production ready. So time for round 2, let’s see how things turn out this time.
TL;DR
There are still some things that can be improved, but the overall experience was much better than a few months ago. It’s nice to see the product maturing and features getting added, like new templates for Service Bus and Consumption Plan support. It’s still a preview, so you shouldn’t run this in production yet but the different teams are getting there!
Prerequisites
Still the same: Python 3.6 and the Azure Functions Core tools. It’s nice to see that the team now correctly states that Python 3.6 is required in their tutorial, and not 3.6 or above. Of course I did try running everything with Python 3.7, which gives a proper error message stating 3.6 is required.
The focus of this blog post will be on Azure Functions and it’s Python support, almost everything written below can be done from a terminal. In a real world scenario you’ll probably be using and IDE like Visual Studio Code with a bunch of extensions, which you can find on the marketplace. The extensions most relevant for this blog post are:
- Python
- Azure Functions (New: enable the setting ‘enablePython’ so you can use the extension to create a new Python Azure Functions project. Beware, this is still in preview!)
You should also install the Azure CLI or Azure PowerShell for deploying to Azure
Using VS Code to create a new Python Azure Function:
- The Azure Functions extension enables you to create new Python function if you enable the setting ‘enablePython’. However, as I have Python 3.7 installed and the extension doesn’t use the Python launcher ‘py’ with the -3.6 flag, it’ll run its scripts on Python 3.7. As stated above, this won’t work. So back to creating a new project the hard way and we’ll open it afterward with VS Code. This functionality will probably work fine if you just have Python 3.6 installed!
Creating a new Python Azure Function manually
- Open your favorite prompt (I’m using cmder) and issue the command
py -3.6 -m C:\Projects\MyFunctionApp\envto create a new Python Virtual Environment. By creating the virtual environment within your project directory, VS Code will later automatically detect it. - Activate the Virtual Environment my issuing the command
C:\Projects\MyFunctionApp\env\Scripts\activate.bat - Create a new (empty) Function App:
func init C:\Projects\MyFunctionApp --worker-runtime python - Add a new function to the app:
func new. I picked the HTTP Trigger again, but It’s great to see that the amount of supported template has almost doubled:- Blob
- Cosmos DB
- HTTP
- Queue
- Timer
- Event Grid (new!)
- Event Hub (new!)
- Service Bus Queue (new!)
- Service Bus Topic (new!)
- Time to have a look around. I notice one main difference compared to my previous try: The requirements.txt file now specifies the dependencies in a proper way! The older version of the Azure Functions tools would specify some command that would use GIT to clone an entire repository and build the dependencies on the fly. This was very slow and resulted in issues while deploying. Now it’s just a clean “azure-functions” and “azure-functions-worker”, together with a few others.
- Let’s run the function locally:
func start. It works - on my machine ;) Test with the “REST Client” extension or just visit the URL with your browser.
Deploying to Azure
- First update the requirements.txt file with any new dependencies:
pip freeze > requirements.txt. In my case ptvsd, pylint and a bunch of others are new. - Create a new Function App in Azure. There are a couple of ways, See instructions here or just follow this URL to create one in the portal. If using the latter, pick Linux as OS and the Python as Runtime Stack.
- Compared to my previous try, the querystring that enables Python support for functions has changed from ?websitesextension_PythonFunctions=true to ?websitesextenion_LinuxConsumption=true. It appears that consumption plans are now available for Python Azure Functions, making it a proper serverless solution. Previously only App Service Plans were supported.
- Back to the CLI. Apparently, the
func azure loginhas been removed from the Azure Functions Core Tools and you should use the Azure CLI or Azure PowerShell. To log in with the Azure CLI issue the commandaz loginand follow instructions. - Use
az account list --output tablefor an overview of your subscriptions and activate the right one withaz account set --subscription "Subscription Name" - Publish your function app:
func azure functionapp publish YourFunctionAppName.- Error 1: ‘Your app is configured with Azure Files for editing from Azure Portal.’. Use the
--forceswitch to override this warning. - Error 2: ‘ERROR: cannot install wrapt-1.10.11 dependency: binary dependencies without wheels are not supported. Use the
--build-native-depsoption to try building the binary dependencies using a Docker container.’. My first attempt at trying to resolve this error was by just removing the ‘wrapt’ dependency from the requirements.txt, that didn’t work and would be a terrible workaround anyway because we need that dependency. The second attempt was following the suggestion in the error message, use Docker to build dependencies. That seemed to work.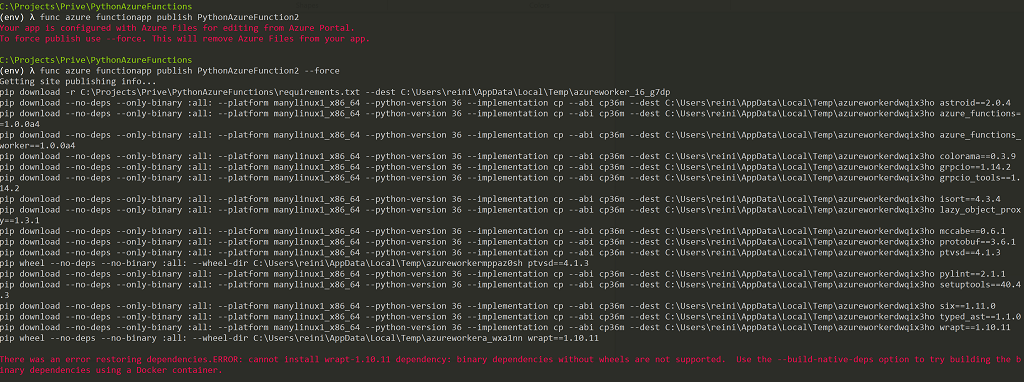
- Error 1: ‘Your app is configured with Azure Files for editing from Azure Portal.’. Use the
- Publishing your function app with all the switches:
func azure functionapp publish YourFunctionAppName --force --build-native-deps - After a short while, you’ll see some output which states: “Deployment completed successfully.” Time to try out the function!
- It works, as you can see in the screenshot below!

Last but not least, opening the project in VS Code
- When you open the folder in VS Code, it’ll detect after a while that the project is an Azure Functions project created outside of VS Code and asks if it should initialize the project properly.
- Something new happens here as well. An error as soon as you click yes. It complains about not being able to activate a virtual environment or install “ptvsd”, because of path troubles. Ptvsd is short for Python Tools for Visual Studio debug server which lets you debug your Python scripts in VS Code. As I’m mainly interested in the Azure Functions part at the moment and not in any VS Code issues or debugging, we’ll ignore the error for now. I did try and install ptvsd manually by executing
pip install ptvsd, which went fine.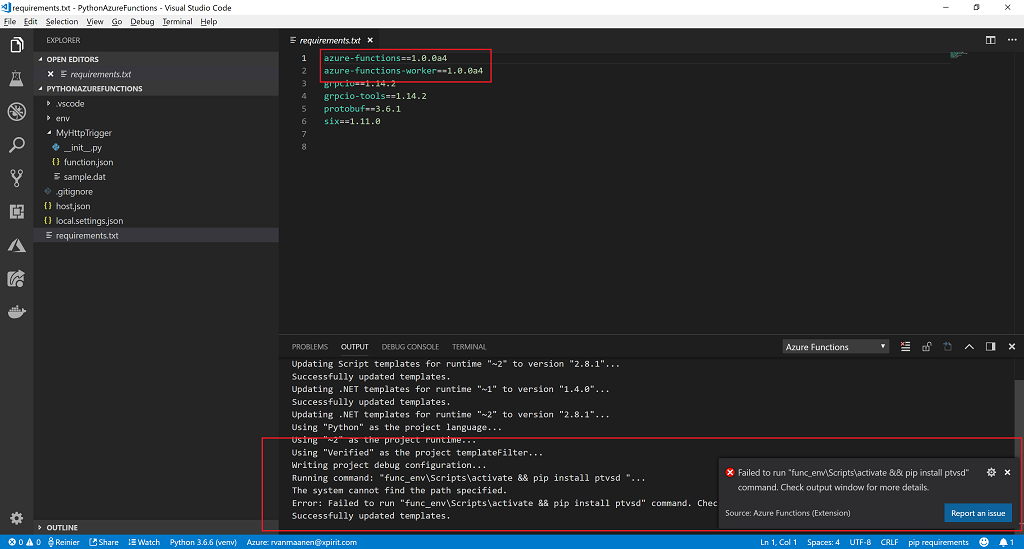
- As this post was mainly an update / correction for my previous blog post about Python on Azure Functions, I’ll leave it at this!